すっかり JXA のネタばかりになってしまった。
だって面白いんだもん、昔 PyGtk を始めた頃を思い出す。
知らなかったフレームワークを使いこなせるようになるとガンガン捗る。
プログラミングの面白さは言語ではなく GTK+, Cocoa 等だよね。
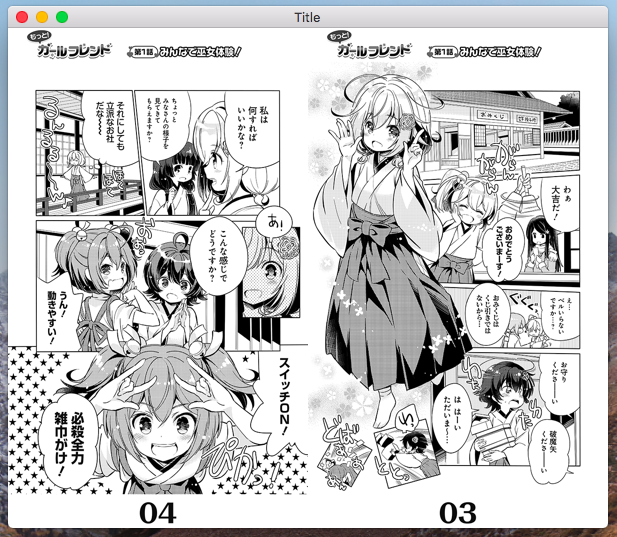
ところで NSImageView を使わなくても画像が表示できることが解った。
てか DnD を実装するのにコイツがあるとチト困るので変えることにした。
ただ手段として NSView の drawRect を override する必要がある。
以前ドン詰まりしたけどもう一度手段を探しまくること 8 時間w
なんだよ、公式の一番下にあるじゃん!
プロパティに id を指定できるのか。
それなら NSImage をコッチで保持すれば計算もやりやすくなる。
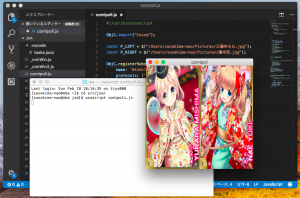
300 行近くなったので今回は抜き出しコードで。
ObjC.registerSubclass({
    name: "ComipoliView",
    superclass: "NSView",
    properties: {
        firstPage: "id", // NSImage
        secondPage: "id",
        LtoR: "bool",
        spread: "bool"
    },
    methods: {
        "drawRect:": function(rect) {
            if (!this.firstPage.isNil()) {
                let aw = rect.size.width;
                let ah = rect.size.height
                let w = this.firstPage.size.width;
                let h = this.firstPage.size.height;
                // Horizontal?
                if (w - h > 0 || !this.spread) {
                    // Single Page
                    let width, height, x, y = 0;
                    if (aw * h > ah * w) {
                        width = w * ah / h;
                        height = ah;
                        x = (aw - width) / 2;
                        y = 0;
                    } else {
                        width = aw;
                        height = h * aw / w;
                        x = 0;
                        y = (ah - height) / 2;
                    }
                    let r1 = $.NSMakeRect(x, y, width, height);
                    this.firstPage.drawInRect(r1);
                } else {
                    if (!this.secondPage.isNil()) {
                        let left = ah * w / h;
                        if (this.LtoR) {
                            let r1 = $.NSMakeRect(aw / 2 - left, 0, left, ah);
                            this.firstPage.drawInRect(r1);
                            //
                            let w2 = this.secondPage.size.width;
                            let h2 = this.secondPage.size.height;
                            let right = ah * w2 / h2;
                            let r2 = $.NSMakeRect(aw / 2, 0, right, ah);
                            this.secondPage.drawInRect(r2);
                        } else {
                            let r1 = $.NSMakeRect(aw / 2, 0, left, ah);
                            this.firstPage.drawInRect(r1);
                            //
                            let w2 = this.secondPage.size.width;
                            let h2 = this.secondPage.size.height;
                            let right = ah * w2 / h2;
                            let r2 = $.NSMakeRect(aw / 2 - right, 0, right, ah);
                            this.secondPage.drawInRect(r2);
                        }
                    }
                }
            }
        }
    }
}

// etc...

this.comipoliView = $.ComipoliView.new;
this.comipoliView.LtoR = false;
this.comipoliView.spread = true;
this.window.contentView.addSubview(this.comipoliView);
で
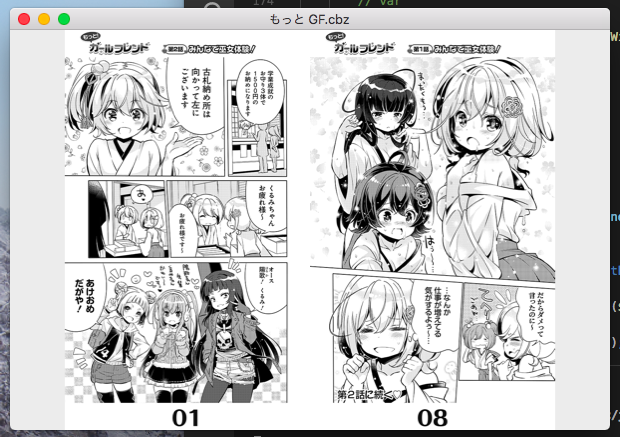
サブクラス内でアスペクト比計算まで完結するコードのできあがり。
注意点はアロー関数を使うと this が変わってしまうってとこだけ。
DnD もこれで簡単に実装できたし完成も近いかな。
バックアップを兼ねてソースも置いておこう、なんか久々。
20180304.tar.gz
次は何を実装するかな、プログラミングが面白すぎる。
おかげで GF(仮) を全然やっていないw
今回はむったん取れるのに、なんかもういいや。。。。。