PyObjC」タグアーカイブ

NSView Auto Layout

NSView のレイアウト方式いろいろ – ひ?to?り?go?と

こんなの見つけた。
windowDidResize に頼らず NSView を引き延ばす手段がこんなにあったんだ。

autoresizingMask の指定
addConstraints でアンカーの指定
layout のオーバーライド

一つづつ作って試すの面倒だから NSView の上に NSView を置いて。
上記三つを全部 PyObjC でやってみた。

#!/usr/bin/env python3

from AppKit import *

RECT = ((0, 0), (300, 100))
wins = []

class TopView(NSView):
    def initWithFrame_(self, rect):
        objc.super(TopView, self).initWithFrame_(rect)
        return self

    def drawRect_(self, rect):
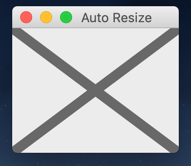
        # 全体にバッテンを描く
        NSColor.darkGrayColor().set()
        path = NSBezierPath.bezierPath()
        path.setLineWidth_(10)
        path.moveToPoint_((0, 0))
        path.lineToPoint_(rect.size) # タプルなのでこれでいい
        path.moveToPoint_((0, rect.size.height))
        path.lineToPoint_((rect.size.width, 0))
        path.stroke()

class SecondView(NSView):
    def initWithFrame_(self, rect):
        objc.super(SecondView, self).initWithFrame_(rect)
        self.v = TopView.alloc().initWithFrame_(RECT)
        self.addSubview_(self.v)
        return self

    def layout(self):
        # Override
        objc.super(SecondView, self).layout()
        self.v.setFrameSize_(self.frame().size)

class ThirdView(NSView):
    def initWithFrame_(self, rect):
        objc.super(ThirdView, self).initWithFrame_(rect)
        self.v = SecondView.alloc().initWithFrame_(RECT)
        self.addSubview_(self.v)
        #
        # addConstraints
        #
        self.v.setTranslatesAutoresizingMaskIntoConstraints_(False)
        self.addConstraints_([
            self.v.leftAnchor().constraintEqualToAnchor_constant_(self.leftAnchor(), 0),
            self.v.rightAnchor().constraintEqualToAnchor_constant_(self.rightAnchor(), 0),
            self.v.topAnchor().constraintEqualToAnchor_constant_(self.topAnchor(), 0),
            self.v.bottomAnchor().constraintEqualToAnchor_constant_(self.bottomAnchor(), 0)
        ])
        return self

class MyWindow(NSWindow):
    def init(self):
        objc.super(MyWindow, self).initWithContentRect_styleMask_backing_defer_(
            RECT,
            NSTitledWindowMask | NSClosableWindowMask |
            NSResizableWindowMask | NSMiniaturizableWindowMask,
            NSBackingStoreBuffered, False)
        self.center()
        self.setTitle_('Auto Resize')
        #self.setDelegate_(self)
        # View
        self.v = ThirdView.alloc().initWithFrame_(RECT)
        self.contentView().addSubview_(self.v)
        #
        # autoresizingMask
        #
        self.v.setAutoresizingMask_(NSViewWidthSizable | NSViewHeightSizable) # 2+16
        #
        return self

    #def windowDidResize_(self, sender):
    #    self.v.setFrameSize_(self.contentView().frame().size)

class AppDelegate(NSObject):
    def applicationDidFinishLaunching_(self, notification):
        window = MyWindow.new()
        window.makeKeyAndOrderFront_(window)
        wins.append(window)

class AppMenu(NSMenu):
    def init(self):
        objc.super(AppMenu, self).init()
        item_app  = NSMenuItem.new()
        self.addItem_(item_app)
        menu_app = NSMenu.new()
        item_app.setSubmenu_(menu_app)
        # quit menu
        item_quit = NSMenuItem.new()
        item_quit.initWithTitle_action_keyEquivalent_('Quit App', 'terminate:', 'q')
        menu_app.addItem_(item_quit)
        return self

NSApplication.sharedApplication()
NSApp.setMainMenu_(AppMenu.new())
NSApp.setDelegate_(AppDelegate.new())
NSApp.activateIgnoringOtherApps_(True)
NSApp.run()

なるほど、全部 PyObjC からでも使えますね。
でも結局 windowDidResize が一番扱いやすいような。。。。。

NSPopUpButton, NSComboBox

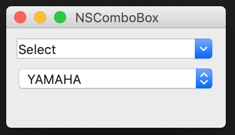
NSComboBox を使ってみたけど何か変だ。
システム環境設定のコンボボックスと形が違う。
タップでプルダウンも矢印の所しか反応しないし何コレ?

Views and Controls | Apple Developer Documentation
どうやらこれは NSPopUpButton というコントロールのようだ。
GTK+ みたいに Gallery が欲しいんですけど。
Widget Gallery: GTK+ 3 Reference Manual

NSComboBox が NSTextField のサブクラス。
NSPopUpButton が NSButton のサブクラス。

items = ['YAMAHA', 'SUZUKI']

class MyView(NSView):
    def initWithFrame_(self, rect):
        objc.super(MyView, self).initWithFrame_(rect)
        #
        # NSComboBox @ NSTextField init method
        cbox = NSComboBox.labelWithString_('Select')
        w, h = cbox.frameSize() # Get Control Height
        cbox.setFrame_(((10, 10), (200, h)))
        cbox.addItemsWithObjectValues_(items)
        self.addSubview_(cbox)
        #
        # NSPopUpButton
        pop = NSPopUpButton.alloc().initWithFrame_pullsDown_(((10, 40), (200, h)), False)
        pop.addItemsWithTitles_(items)
        self.addSubview_(pop)
        #
        return self

未選択状態が必要な場合は NSComboBox を利用。
みたいな使い分けでいいのかな?
どこをタップしてもいい NSPopUpButton はタッチ操作向けだよな。
もう少し弄ってみる。

pythonhosted

あれ? https://pythonhosted.org/pyobjc/index.html が消えている。

PyObjC Document はコッチに移動(?)したようだ。
Introduction ? PyObjC – the Python to Objective-C bridge
以前からあったのかどうかは知らない、基本 Fedora 屋なので。

というわけで NSTextField Tips 追加。
NSTextField – L’Isola di Niente
短いけど実用には充分にしたつもり。

しかし textDidChange: は何故デリゲートではなくメソッドなんだよ。
NSButton に至っては target, action 指定だし、この統一感の無さが macOS の中身。
macOS の洗練された見た目と統一された操作性はこの糞みたいな Cocoa で作られている。
GTK+ も GTK3 にならなかったらこんな感じになっていたんだろうな。

次は NSTextView にしようと思ったけど。
NSTextView – AppKit | Apple Developer Documentation
Rich Text のことばかりみたいだなぁ、ヤル気しねぇ。
NSSlider, NSComboBox あたりにしよう、のんびりと。

Quick Action @ change72dpi (PyObjC)

自作アプリの件が片付いたので PyObjC Tips の続きを。
NSButton – L’Isola di Niente

NSButton だけで長くなってしまったのでコレだけで一頁にした。
3D タッチ処理がこんなに簡単だとは思わなかった、AppKit スゲェ。

それはそうと、sips がおかしい、サイズが半分の半分になるんだが。
今まで下記クイックアクションに登録したコードでイケていたのに急に何故だ?
macOS をクイックアクションで拡張 – L’Isola di Niente

スクリーンショットが必要なのに困った。
緊急で自作スクリプトを作る。

#!/usr/local/bin/python3

import sys, os
from AppKit import *
from Quartz.CoreGraphics import *

os.chdir(os.path.dirname(sys.argv[1]))
args = sys.argv[1:]

for s in args:
    name = os.path.basename(s)
    src_image = NSImage.alloc().initWithContentsOfFile_(name)
    img = NSBitmapImageRep.imageRepWithData_(src_image.TIFFRepresentation()).CGImage()
    h = CGImageGetHeight(img) // 2
    w = CGImageGetWidth(img) // 2
    ctx = CGBitmapContextCreate(None, w, h, 8, 4 * w, CGColorSpaceCreateDeviceRGB(), kCGImageAlphaPremultipliedLast)
    CGContextDrawImage(ctx, CGRectMake(0, 0, w, h), img)
    imgref = CGBitmapContextCreateImage(ctx)
    out_image = NSImage.alloc().initWithCGImage_size_(imgref, (w, h))
    bmp = NSBitmapImageRep.imageRepWithData_(out_image.TIFFRepresentation())
    data = bmp.representationUsingType_properties_(NSBitmapImageFileTypePNG, {})
    data.writeToFile_atomically_(f'72dpi-{name}', True)

change72dpi という拡張子の無い名前にして +x パーミッション。

Comipoli で使っているコードをフルパス用に書き換えて同じ結果になるように。
クイックアクションは以前の command+shift+S でコピーを作って。

/Users/sasakima-nao/bin/change72dpi "@"

に書き換え保存。

とにかく、GUI を使うなら何をするにもフルパスが必要。
まさかのシバンまでフルパスに、いやシンボリックリンクなんだけどさすがに通った。
だからパスが通っているディレクトリに入れる必要は無いけどなんとなく。

Linux みたくフルパスを使うことのほうが珍しいにしてくれよ。
セキュリティなんて SELinux みたいなので充分だろ。

Graphics

18 日に上げた PyObjC Tips の日付が 2018 年になってた!
よしさっさと更新してごまかしてまえwwwww

PyObjC Tips – L’Isola di Niente

てか、AppKit に関しては comipoli で必要な API しか調べていないんで。
全部調べて作ってだとスゲェ時間が掛かるので細切れで出すことにした。
ゴールデンウイークは 10 連休なのでもちっと進めたい。

あっちにも書いたけど。
Cocoa Dev Central: Cocoa Graphics with Quartz
Cocoa Dev Central: Cocoa Graphics with Quartz II
すごく解りやすいよね。
今後のページ作りの参考にしよう。

cairo だとココとか。
Cairo samples

日本語でこの手を探すとスクショだらけな Xcode の使い方解説ばかりで困る。
Visual Studio もそうだったね、Mac も Windows も本当に何も変わらないなと。
インストールのスキルしか上がらない Node.js よりマシ程度。
日本人はコードを書くのが嫌いなんだろうか?