Programming」カテゴリーアーカイブ

Python with GTK 3 Drag and Drop

今回は Python with GTK+ 3 で Drag and Drop をやってみる。
といってもファイルドロップで URI を得るというよく利用するものだけだが。

Drag and Drop

何か色々と細かくなったような気がするけどあまり変わっていなかった。
drag_dest_set() で text/uri-list を指定するだけでドロップ受け入れ処理は終わり。

ただし GtkTargetEntry は new で作成し list にして渡す必要があった。
PyGtk の場合はタプルのリストで良かったので少しだけ面倒くさくなった。
やはり C で書くのとも PyGtk で書くのとも微妙に違っていて迷う。

ところで drag-data-received シグナルのハンドラなんだが

def on_drag_data_received(self, widget, drag_context, x, y, data, info, time):
    """
    PyGtk
    if "\r\n" in data.data:
        uris = data.data.split("\r\n")
    else:
        uris = data.data.split("\n")
    """
    # Python with GTK+ 3
    uris = data.get_uris()

と get_uris() だけで list が得られるようになっている。
これで送られてくる uri-list の改行コードを気にしなくて済む。

それと前やった時には何故か気がつかなかったのだけど
GtkApplication にセットする方法なら delete-event 処理は不要なんだね。
Delphi の TApplication のように全ての Window を閉じた時点で終了するようだ。

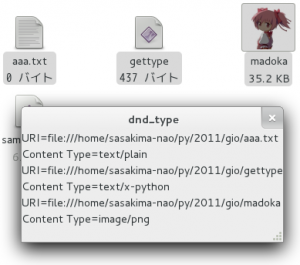
ついでに以前 PyGtk でやった content-type を得る方法も入れてと。
というか、ソレらをやらないと Y901x の GTK3 化ができない。

後は GTK+ 3 に合わせて書き換えていく。

#!/usr/bin/env python
#-*- coding:utf-8 -*-

import sys
import gi
try:
    gi.require_version("Gtk", "3.0")
except:
    print "This Program is GTK+ 3.0 or later."
    sys.exit()

from gi.repository import Gtk, Gdk, Gio

class Win(Gtk.Window):
    def __init__(self):
        Gtk.Window.__init__(self)
        # DnD
        dnd_list = Gtk.TargetEntry.new("text/uri-list", 0, 0)
        self.drag_dest_set(
                Gtk.DestDefaults.MOTION |
                Gtk.DestDefaults.HIGHLIGHT |
                Gtk.DestDefaults.DROP,
                [dnd_list],
                Gdk.DragAction.MOVE )
        # GtkLabel
        self.label = Gtk.Label("Please drop your files")
        self.add(self.label)
        # Gtk.Window
        self.drag_dest_add_uri_targets()
        self.connect("drag-data-received", self.on_drag_data_received)
        self.set_title("dnd_type")
        self.show_all()

    def on_drag_data_received(self, widget, drag_context, x, y, data, info, time):
        uris = data.get_uris()
        s = ""
        for uri in uris:
            f = Gio.file_new_for_uri(uri)
            info = f.query_info(
                    Gio.FILE_ATTRIBUTE_STANDARD_CONTENT_TYPE,
                    Gio.FileQueryInfoFlags.NONE,
                    None)
            content_type = info.get_content_type()
            s += "URI={0}\nContent Type={1}\n".format(uri, content_type)
        self.label.set_text(s)

class App(Gtk.Application):
    def __init__(self):
        Gtk.Application.__init__(
                self,
                application_id="apps.test.trash",
                flags=Gio.ApplicationFlags.FLAGS_NONE)
        self.connect("activate", self.on_activate)
        
    def on_activate(self, application, user_data=None):
        w = Win()
        # Gtk.main_quit is Do not Need
        w.set_application(self)
    
if __name__ == "__main__":
    app = App()
    app.run(sys.argv)

情報が少ないなりにマシになったと思う。
日本語で検索してもまったく情報が見当たらないんだが需要はそんなに無いのかな…

**********

CNN.co.jp:ユーザーのIQが高いブラウザーは? ブラウザー別IQテスト

比較的どころかまったく人気が無い Linux 版 Opera な私は IQ が極めて高い。
わけが無い、工業高校機械化卒な現場のオッサンだもの。
PyGI GTK+ Version

PyGI – GNOME Live!

で Gtk+ 等のバージョン振り分け方法を今頃知った。

Get GTK+ theme colors with python and GObject introspection – Stack Overflow

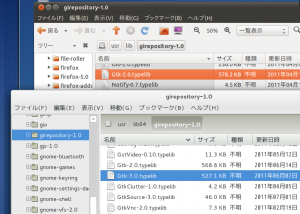
とにかく gi.repository は(我が fedora は 64bit)
/usr/lib64/girepository-1.0
というディレクトリにある *.typelib というファイル群である。

Ubuntu 11.04 デフォルトには Gtk-3.0.typelib は無い。
Gtk+3.0 自体が無いのだから当然だが、最新なのに古臭さを感じるよ。

pygobject – Python bindings GLib and GObject

この demos にあるサンプルは GtkDrawingArea の draw シグナルを使っているが…
Gtk+ 2 になる Ubuntu とかじゃ例外になるはずなんだがいいのかな。

import gi
gi.require_version('Gtk', '2.0')
from gi.repository import Gtk

とやれば Fedora 15 でも Gtk2 になる。
そんなことする人いないだろうけど Ubuntu 11.04 対応を Fedora 15 から確認なんかに使えるな。
Gtk2 を使うなら枯れた PyGtk のほうが楽だもの、サンプルコードはゴロゴロあるし。

import sys
import gi
try:
    gi.require_version("Gtk", "3.0")
except:
    print "This Program is GTK+ 3.0 or later."
    sys.exit()

Gtk+ 3 専用の場合はこうするのが賢明かな。

Python with Clutter(GNOME3)

Fedora 15 を使っていて GTK+3 をやらない人は何故 Fedora を選んだのだろう。
なんて思っていたけど GNOME 3 の UI は GTK+ だけでは無いようだ。

GNOME 開発センター

Clutter って何だろう。

OpenGLを利用するマルチプラットフォーム対応GUIツールキット「Clutter 1.0」リリース – SourceForge.JP Magazine : オープンソースの話題満載

ようするに Windows の WPF みたいなものかな。
Python からでも使えるようなので試してみよう。
Clutter の所をクリックして coocbook に辿り着く。
まあ当然のごとく C 言語での解説しか無いので Python では自力で漁る。

#!/usr/bin/env python
#-*- coding:utf-8 -*-

import sys
from gi.repository import Clutter

def quit(widget):
    Clutter.main_quit()

init = Clutter.init(sys.argv)
if init[0] == Clutter.InitError.SUCCESS:
    stage = Clutter.Stage()
    stage.connect("destroy", quit)
    stage.show()
    Clutter.main()

Python with GTK+ 3 をやったのと同じ感覚で Window が作れた。
Clutter.init は何故かタプルを戻すので最初の値で初期化エラーの確認を行う。
destroy に直接 main_quit を指定すると例外になるので注意。

ExamplePython – ClutterProject

こんなページも見つけたけど Clutter.Stage だけで Window になる。

2. Drawing a shadow under the text

上記をやろうと思ったけど cogl-pango の import 方法が解らない。
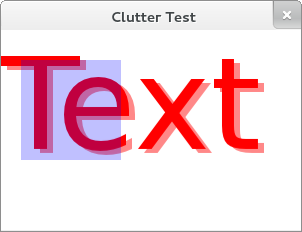
でも WPF みたいなものなら opacity で調節してズラしたものを重ねればいいんでない。

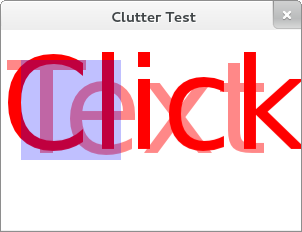
5. Making an actor respond to button events

この四角形を利用したボタンもついでに。

#!/usr/bin/env python
#-*- coding:utf-8 -*-

import sys
from gi.repository import Clutter

class TestStage(Clutter.Stage):
    def __init__(self):
        Clutter.Stage.__init__(self)
        # Color
        red_full = Clutter.Color.new(0xff, 0x00, 0x00, 0xff)
        red_half = Clutter.Color.new(0xff, 0x00, 0x00, 0x77)
        blue = Clutter.Color.new(0x00, 0x00, 0xff, 0x3f)
        # Text
        self.text1 = Clutter.Text.new_full("Sans 128px", "Text", red_full)
        text2 = Clutter.Text.new_full("Sans 128px", "Text", red_half)
        text2.set_position(6, 4)
        self.add_actor(self.text1)
        self.add_actor(text2)
        # Button (rectangle)
        rect = Clutter.Rectangle.new_with_color(blue)
        rect.set_size(100, 100)
        rect.set_position(20, 30)
        rect.set_reactive(True)
        rect.connect("button-press-event", self.on_click)
        self.add_actor(rect)
        # self
        self.connect("destroy", self.quit)
        self.set_title("Clutter Test")
        self.set_size(300, 200)
        self.show_all()

    def quit(self, widget):
        Clutter.main_quit()

    def on_click(self, actor, event, user_data=None):
        if self.text1.get_text() == "Text":
            self.text1.set_text("Click")
        else:
            self.text1.set_text("Text")

if __name__ == '__main__':
    init = Clutter.init(sys.argv)
    if init[0] == Clutter.InitError.SUCCESS:
        TestStage()
        Clutter.main()

なるほど、やっぱり DirectX 描写の WPF みたいなものだね。
OpenGL 描写の部品を重ねたり直接コールバックを指定できたりで面白い。
でも Button とかの widget クラスは用意されていないみたい。
というか、そういう使い道では無いんだろうね、機会があったら利用しよう。

Python with GTK+3 SendMessage

Python with GTK+3 で application_id の使い道。
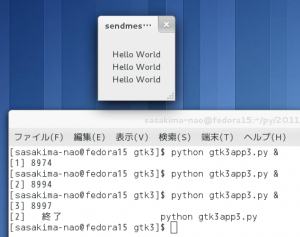
どうやら Windows API の SendMessage みたいになことができるようだ。

LibUnique/Example – GNOME Live!

libunique を Python で使う方法は解らない…
色々探してみてこんなのを見つける。

Migrating from libunique to GApplication or GtkApplication

なんか GtkApplication や GtkWindow から直接送受信できそうだ。
でもコレって継承した GtkWindow の自作関数なんかも利用できるのかな。
試してみる、GList から Window を得るには添字でイケるようだ。

#!/usr/bin/env python
#-*- coding:utf-8 -*-

from gi.repository import Gtk, Gio

class Win(Gtk.Window):
    def __init__(self):
        Gtk.Window.__init__(self)
        self.set_title("sendmessage")
        self.set_border_width(24)
        self.label = Gtk.Label("Hello World")
        self.add(self.label)
        self.show_all()

    def append_text(self, text):
        s = self.label.get_text()
        self.label.set_text("{0}\n{1}".format(s, text))

class App(Gtk.Application):
    def __init__(self):
        Gtk.Application.__init__(
                self,
                application_id="apps.test.helloworld",
                flags=Gio.ApplicationFlags.FLAGS_NONE)
        self.connect("activate", self.on_activate)
        
    def on_activate(self, data=None):
        l = self.get_windows()
        if l:
            l[0].append_text("Hello World")
            return
        w = Win()
        w.set_application(self)
    
if __name__ == "__main__":
    app = App()
    app.run(None)

起動中 Window の関数がそのまんま呼び出せる。
多重起動防止処理がこんなに簡単になっていたとは知らなかった。

Python with GTK+3.0 GtkPixbuf Saveing

昨日及び今朝の追記で GdkPixbuf の扱い方は解った。
今度は保存、無意味に勉強してもツマランので Gedit Plugin にする。

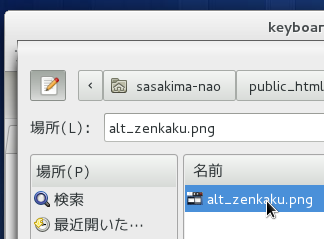
メニューで選択すると GtkFileChooserDialog を出す。
画像を選択して OK すると 300*300 以下の縮小画像を画像位置に自動生成する。
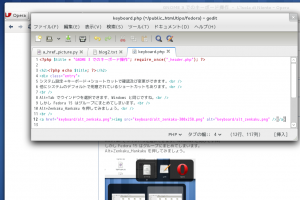
それをリンク画像にし元画像へのリンク文字列を相対パスでカーソル位置に流し込む。
つまり blog 機能のようなモンを作って自分が楽したいので。

仕様として JPEG, PNG 限定でいいだろう。
圧縮レベルは Gimp デフォルトに合わせ JPEG:85, PNG:9 固定。
ダイアログを出して縮小サイズ指定や圧縮率変更も可能だけどパス。
保存されていない場合は相対パスが得られないから弾く。
メニューの挿入位置は「ファイル(f)」メニューに入れたほうが迷わないと思う。
こんなもんかな。

File saving

gdk_pixbuf_save 関数があるはずだがドコにも見つからなかった。
しかたがないので Pixbuf オブジェクトの savev メソッドを使う、多分大丈夫。

scale_simple メソッドは GdkPixbuf.Pixbuf 内にあった。
GTK2 の時と使い方はあまり変わらないようだ。

savev メソッドの第三及び第四引数は何故かリストにする必要があった。
文字列にすると WARNING が出るし適用されないしで困ったよ。

os.path.relpath を初めて使ったけどコレって基準はディレクトリ名なんだね。

アスペクト比の計算は以前作ったというか動画プレイヤーで散々やったしコピペでいい。
何か作りつづけていれば後々で何かに流用できる。

後はとにかく GTK+3.0 の仕様に合わせてひたすら書く。
半分以上が dir() でメソッドや列挙体名を探しまくる時間だったのは秘密だよ。
結構外国からのアクセスがあるので相変わらず全部英語でコメント。

#-*- coding:utf-8 -*-

#    Gedit a_href_picture plugin version 3.0.0
#    Copyright © 2011 sasakima-nao <m6579ne998z@gmail.com>
#
#    This program is free software; you can redistribute it and/or modify
#    it under the terms of the GNU General Public License as published by
#    the Free Software Foundation; either version 2 of the License, or
#    (at your option) any later version.

from gi.repository import GObject, Gedit, Gtk, GdkPixbuf
import os

ui_str = """<ui>
    <menubar name="MenuBar">
        <menu name="FileMenu" action="File">
            <placeholder name="FileOps_1">
                <menuitem name="AHrefPicture" action="AHrefPicture"/>
            </placeholder>
        </menu>
    </menubar>
</ui>
"""

class AHrefPicturePlugin(GObject.Object, Gedit.WindowActivatable):
    """
        Create small image and link insert
        (e.g. <a href="img/pic1.jpg"><img src="img/pic1-300x225.jpg" alt="img/pic1.jpg" /></a>)
        This Plugin Gedit 3 only
    """
    __gtype_name__ = "AHrefPicturePlugin"
    window = GObject.property(type=Gedit.Window)
    def __init__(self):
        GObject.Object.__init__(self)

    def do_activate(self):
        manager = self.window.get_ui_manager()
        self._action_group = Gtk.ActionGroup("AHrefPicturePluginActions")
        # GtkActionEntry
        # name, stock_id, label, accelerator, tooltip, callback
        actions = [("AHrefPicture", None, "a href Picture", None, "a href Picture", self.on_a_href_activate)]
        self._action_group.add_actions(actions)
        manager.insert_action_group(self._action_group, -1)
        self._ui_id = manager.add_ui_from_string(ui_str)
        
    def do_deactivate(self):
        manager = self.window.get_ui_manager()
        manager.remove_ui(self._ui_id)
        manager.remove_action_group(self._action_group)
        manager.ensure_update()

    def do_update_state(self):
        self._action_group.set_sensitive(self.window.get_active_document() != None)

    def on_a_href_activate(self, action, data=None):
        doc = self.window.get_active_document()
        viewpath = doc.get_uri_for_display()
        if viewpath[0] != "/":
            self.messagebox("Please save the file")
            return
        dlg = Gtk.FileChooserDialog(
                "Select Picture",
                self.window,
                Gtk.FileChooserAction.OPEN,
                (Gtk.STOCK_CANCEL, Gtk.ResponseType.CANCEL, Gtk.STOCK_OPEN, Gtk.ResponseType.OK) )
        dlg.set_current_folder(os.path.dirname(viewpath))
        r = dlg.run()
        if r == Gtk.ResponseType.OK:
            try:
                filepath = dlg.get_filename()
                pixbuf = GdkPixbuf.Pixbuf.new_from_file(filepath)
            except:
                dlg.destroy()
                return
            # create under 300*300 px image
            d_width = 300
            d_height = 300
            p_width = pixbuf.get_width()
            p_height = pixbuf.get_height()
            width = 0
            height = 0
            if (d_width * p_height) > (d_height * p_width):
                width = p_width * d_height / p_height
                height = d_height
            else:
                width = d_width
                height = p_height * d_width / p_width
            smallpix = GdkPixbuf.Pixbuf.scale_simple(pixbuf, width, height, GdkPixbuf.InterpType.BILINEAR)
            # jpeg or png
            name, ext = os.path.splitext(filepath)
            ext = ext.lower()
            if ext == ".jpg" or ext == ".jpeg":
                smallpath = "{0}-{1}x{2}.jpg".format(name, width, height)
                smallpix.savev(smallpath, "jpeg", ["quality"], ["85"])
            elif ext == ".png":
                smallpath = "{0}-{1}x{2}.png".format(name, width, height)
                smallpix.savev(smallpath, "png", ["compression"], ["9"])
            else:
                self.messagebox("Extension not found")
                return
            # create image link text
            dpath = os.path.dirname(viewpath)
            path1 = os.path.relpath(filepath, dpath)
            path2 = os.path.relpath(smallpath, dpath)
            result = '<a href="{0}"><img src="{1}" alt="{0}" /></a>'.format(path1, path2)
            # insert text
            view = self.window.get_active_view()
            buf = view.get_buffer()
            buf.insert_at_cursor(result)
        dlg.destroy()

    def messagebox(self, text):
        dlg = Gtk.MessageDialog(
                self.window,  
                Gtk.DialogFlags.MODAL,  
                Gtk.MessageType.WARNING, 
                Gtk.ButtonsType.OK,  
                text)  
        r = dlg.run()  
        dlg.destroy()

という感じに仕上がった。
Plugin は本サイトで公開しているのでコッチはコードの参考に。