Programming」カテゴリーアーカイブ

Change 72dpi Screenshot

前回画像を PIL で WebP 化するネタを書いたけど。
どうせならスクリーンショットの 72dpi 化も同時にやりたい。
72dpi にして WebP にして、って二度手間じゃん。

色々試すとそのまま Image.save は全部 72dpi になるらしい。
ということは半分にリサイズしてセーブするだけですね。

import sys, os, re
from PIL import Image

arg = sys.argv[1:]
for s in arg:
    if re.search(r'\.(jpe?g|png|gif)$', s, re.I):
        im = Image.open(s)
        # 144dip to 72dpi
        x, y = im.size
        im_s = im.resize((x//2, y//2), Image.Resampling.LANCZOS)
        im_s.save(f'{os.path.splitext(s)[0]}.webp')

検索でよく見つかる Image.ANTIALIAS は非推奨になっているので注意。
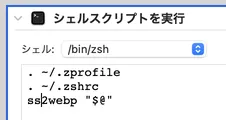
これを前回と同様に Automator でメニューに追加。

mm

ところで前回 .zprofile をフルパスでって書いたけど。
チルダでイケた、ユーザーは自分自身だもんね。

ss

Pillow って思っていたより高機能なんですね、もっと色々やってみよう。
Pillow (PIL Fork) 9.4.0 documentation

WebP conversion @ Automator

[CGImageDestinationCreateWithURL webp] で検索。
以下は一年前に書かれたものだけど。

ios – “unsupported file format ‘org.webmproject.webp'” while saving CGImage in webp format – Stack Overflow

#!/usr/bin/env python3

from Quartz import *

src_type = CGImageSourceCopyTypeIdentifiers()
CFShow(src_type)
dest_type = CGImageDestinationCopyTypeIdentifiers()
CFShow(dest_type)

macOS 13 Ventura でも非サポートなんですね。
どうやら OS 頼りは現状無理っぽい。

しかたがない、Python や PHP を使う。
WebP を使うような人ならどちらかは入れているはず。
これでコマンドを作って Automator で呼び出しする方法を。

PHP: imagecreatefromjpeg – Manual

ココでは Python3 を使う、PHP でやる人は上記サンプルコードを参考に。
Python3 では Pillow(PIL) が必要、残念ながら HEIF は未対応。

pip install Pillow

いつのまにか pip3 でなく pip でイケるようになってる。
python3 も 3 を打たなくていいようにしてよ、Fedora みたく。
そしてコマンドを書く。

#!/usr/bin/env python3

import sys, os, re
from PIL import Image

arg = sys.argv[1:]
for s in arg:
    if re.search(r'\.(jpe?g|png|gif)$', s, re.I):
        im = Image.open(s).convert('RGB')
        im.save(f'{os.path.splitext(s)[0]}.webp', 'webp')

を拡張子無し実行パーミッション有りでパスの通った場所に置く。
名前は img2webp とか解りやすい名前にしておく。

Automator で新規書類、クイックアクションを選択。
「指定されたFinder項目を取得」のアクションをドラッグで配置。
「シェルスクリプトを実行」を同様に配置。
ワークフローが受け取る現在の項目を「イメージファイル」に。
入力の引渡し方法を「引数として」に。
そしてシェルスクリプトに自作コマンドを呼び出すコードを。

# Automator は読み込まないのでフルパスをドットコマンド
# もちろん source コマンドでもいい
. /Users/sasakima-nao/.zprofile
. /Users/sasakima-nao/.zshrc
# 自分が付けたコマンド名にしてね
img2webp "$@"

automator

いや、~/.zshrc とかに何も登録していないなら読み込まなくていいけど。
Python 3.10 は ~/.zprofile に書き込みしているから呼び出せるのであって。
コレをしないと場合によっては古いバージョンを呼び出しとかしてしまう。
読み込まない又はパスを通していない場合は自作コマンドもフルパスにしてね。
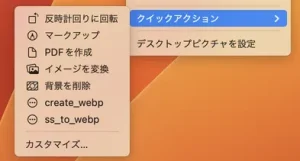
とにかくコレを create_webp とか解りやすい名前で保存。

menu

困ったことにデジカメの RAW 画像でも出ちゃうんだなこれが。
なので拡張子で振り分けする処理は必須です、おしまい。
このスクリーンショットはコレで変換した WebP 画像でした。

Image conversion @ PyObjC and JXA

前回書いた検索で簡単に見つかる画像変換ですが。
Objective-c での公式は以下に。

Viewing, Editing, and Saving Images in an Image View

PyObjC でしたら以下がありますね。

[PyObjC CoreGraphics API Example] Shows how to use the functional API of the CoreGraphics framework through PyObjC and Python 2.7. #pyobjc #python #coregraphics #quartz #macos #examples ? GitHub

ただし Python2 コードですし kUTTypeJPEG はとうの昔に非推奨です。
Python3 にて UniformTypeIdentifiers.UTTypeJPEG を使うよう書き換え。

System-declared uniform type identifiers | Apple Developer Documentation

したんだけど何度やってもエラー、原因が解らず困っていた。
本日原因が判明した、こんな理由だったとは。

#!/usr/bin/env python3

import UniformTypeIdentifiers, LaunchServices

print(type(LaunchServices.kUTTypeJPEG))
print(type(UniformTypeIdentifiers.UTTypeJPEG))

''' output
<class 'objc.pyobjc_unicode'>
<objective-c class _UTCoreType at 0x1e3f02bd0>

'''

まさかの。
PyObjC の kUTTypeJPEG は単なる文字列だった。

UTTypeJPEG は普通にポインタ、そりゃエラーになるよと。
ということで PyObjC ではこんなコードになります。
破棄は Python にまかせないと二重破棄でエラー。

#!/usr/bin/env python3

from AppKit import *
from Quartz import *
from UniformTypeIdentifiers import *

src = NSURL.fileURLWithPath_('panaleica.heic')
dest = NSURL.fileURLWithPath_('panaleica.jpg')

isr = CGImageSourceCreateWithURL(src, None)
image = CGImageSourceCreateImageAtIndex(isr, 0, None)

destimg = CGImageDestinationCreateWithURL(dest, str(UTTypeJPEG), 1, None)
if destimg:
    CGImageDestinationAddImage(destimg, image, None)
    res = CGImageDestinationFinalize(destimg)
    print(res)
    #CFRelease(destimg) # Error
else:
    print('error')

HEIF や WebP からでも JPEG に変換できる。
ただし iPhone 写真等の回転情報は継承されず横向きになるので注意。

rotate

いやオートメーションで使うなら AppleScript か JXA にしないと。
こちらでは UniformTypeIdentifiers が使えないので直接文字列で。

#!/usr/bin/osascript

ObjC.import('Cocoa');
ObjC.import('Quartz');
//ObjC.import('UniformTypeIdentifiers');

let src = $.NSURL.fileURLWithPath('gara.webp');
let dest = $.NSURL.fileURLWithPath('gara.heic');

let isr = $.CGImageSourceCreateWithURL(src, null);
let image = $.CGImageSourceCreateImageAtIndex(isr, 0, null);

//let destimg = $.CGImageDestinationCreateWithURL(dest, $('public.jpeg'), 1, null); // jpeg
//let destimg = $.CGImageDestinationCreateWithURL(dest, $('public.png'), 1, null); // png
let destimg = $.CGImageDestinationCreateWithURL(dest, $('public.heic'), 1, null);
if (destimg) {
    $.CGImageDestinationAddImage(destimg, image, null);
    let res = $.CGImageDestinationFinalize(destimg);
    console.log(res);
} else {
    console.log('error');
}

後は同じですね。
PyObjC を先にやらなかったら文字列ということに気が付かなかったかも。
HEIF にもコレで変換可能でした。

#!/usr/bin/osascript

// webp is bad

ObjC.import('Cocoa');
ObjC.import('Quartz');

let src = $.NSURL.fileURLWithPath('panaleica.heic');
let dest = $.NSURL.fileURLWithPath('panaleica.webp');

let isr = $.CGImageSourceCreateWithURL(src, null);
let image = $.CGImageSourceCreateImageAtIndex(isr, 0, null);

let destimg = $.CGImageDestinationCreateWithURL(dest, $('org.webmproject.webp'), 1, null);
if (destimg) {
    $.CGImageDestinationAddImage(destimg, image, null);
    let res = $.CGImageDestinationFinalize(destimg);
    console.log(res); // false
} else {
    console.log('error');
}

ただ WebP から変換はできるけど WebP へはどちらでも変換できなかった。
多分 Objective-c や Swift でも、public.*** しか駄目なのだろうか?
一番やりたいことなのに、もう少し調べます。

ところで、こんなことをやって今頃知ったんですけど。
UTTypeCreatePreferredIdentifierForTag が廃止になっています。

UTTypeCreatePreferredIdentifierForTag | Apple Developer Documentation

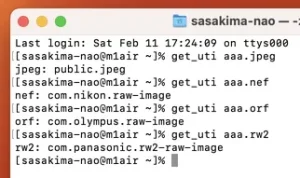
筆者が書いた UTI を調べるコマンドが使えなくなっていて焦った。
というか UTI を調べるコードを書いているブログは全滅だ、わーい!
上記で使おうとして動かなかった、新しい方法を探さなくちゃ。

NSImage: WebP and HEIF

前回 Fedora での WebP 変換について書いたんですけど。
WebP を使いたい層は Web デザイナ、つまり macOS ユーザーが大半かと。
アプリも色々出ているけどオートメーションでサクッと変換できればなって。
ところで NSImage って WebP を扱えるのかな?

#!/usr/bin/env python3

from AppKit import *

RECT = ((0, 0), (400, 300))

class MyView(NSView):
    def initWithFrame_(self, rect):
        objc.super(MyView, self).initWithFrame_(RECT)
        return self

    def drawRect_(self, rect):
        # WebP or HEIF
        image = NSImage.alloc().initWithContentsOfFile_('gara.webp')
        #image = NSImage.alloc().initWithContentsOfFile_('panaleica.heic')
        image.drawInRect_(RECT)

class MyWindow(NSWindow):
    def init(self):
        objc.super(MyWindow, self).initWithContentRect_styleMask_backing_defer_(
            RECT,
            NSTitledWindowMask | NSClosableWindowMask |
            NSResizableWindowMask | NSMiniaturizableWindowMask,
            NSBackingStoreBuffered, False)
        self.setTitle_('WebP Test')
        self.setDelegate_(self)
        # MyView
        self.canvas = MyView.alloc().initWithFrame_(RECT)
        self.contentView().addSubview_(self.canvas)
        #
        return self

class AppDelegate(NSObject):
    def applicationDidFinishLaunching_(self, notification):
        self.mywindow = MyWindow.new().autorelease()
        self.mywindow.makeKeyAndOrderFront_(self.mywindow)

class AppMenu(NSMenu):
    def init(self):
        objc.super(AppMenu, self).init()
        item_app  = NSMenuItem.new()
        self.addItem_(item_app)
        menu_app = NSMenu.new()
        item_app.setSubmenu_(menu_app)
        # quit menu
        item_quit = NSMenuItem.new()
        item_quit.initWithTitle_action_keyEquivalent_('Quit App', 'terminate:', 'q')
        menu_app.addItem_(item_quit)
        return self

pool = NSAutoreleasePool.new()

NSApplication.sharedApplication()
NSApp.setMainMenu_(AppMenu.new())
NSApp.setDelegate_(AppDelegate.new())
NSApp.activateIgnoringOtherApps_(True)
NSApp.run()

del pool

PyObjC でごめん。

mac webp

普通に扱えるんですね、HEIF(heic) 画像でも問題なく。
後はコレを変換だ、と思ったんですけど。

NSBitmapImageFileType | Apple Developer Documentation

NSBitmapImageFileTypeWEBP なんて定義は無いんですね。
HEIF も無い、検索で簡単に見つかる手段は使えないか。
もう少し調べます。

GTK4: DirectoryList

Gtk.DirectoryList

こんなものを今更見つけた。
g_file_enumerate_children_async をラップしているらしい。
つまりコレを使えばファイルマネージャみたいな UI が簡単に作れるようだ。

しかしコレだけじゃどうやって使うのかちっともわからんぞ。
誰かサンプルコードでも書いていないか、探す。

GitHub – ToshioCP/Gtk4-tutorial: A gtk4 tutorial for beginners

おぉありがとう、なんと日本人ではないですか。
Ruby 屋さんのようですがごめん、筆者は PyGObject でやる。
ListItem.get_item で Gio.FileInfo が得られるようで。

#!/usr/bin/env python3

import gi, sys
gi.require_version('Gtk', '4.0')
gi.require_version('Adw', '1')
from gi.repository import Gtk, Gio, Adw

class Win(Gtk.ApplicationWindow):
    def __init__(self, a):
        # Set Adwaita Style
        manager = Adw.StyleManager.get_default()
        manager.set_color_scheme(Adw.ColorScheme.DEFAULT)
        # init
        Gtk.ApplicationWindow.__init__(self, application=a)
        #
        f = Gio.File.new_for_path('.')
        ls = Gtk.DirectoryList(file=f, attributes='standard::name,standard::content-type,standard::size')
        #
        sel_model = Gtk.SingleSelection(model=ls)
        #
        factory1 = Gtk.SignalListItemFactory()
        factory1.connect('setup', self.on_listitem_setup)
        factory1.connect('bind', self.on_listitem_bind1)
        #
        factory2 = Gtk.SignalListItemFactory()
        factory2.connect('setup', self.on_listitem_setup)
        factory2.connect('bind', self.on_listitem_bind2)
        #
        factory3 = Gtk.SignalListItemFactory()
        factory3.connect('setup', self.on_listitem_setup)
        factory3.connect('bind', self.on_listitem_bind3)
        #
        columnview = Gtk.ColumnView(model=sel_model)
        columnview.connect('activate', self.on_columnview_activate)
        #
        column1 = Gtk.ColumnViewColumn(title='Filename', factory=factory1)
        columnview.append_column(column1)
        column2 = Gtk.ColumnViewColumn(title='ContentType', factory=factory2)
        columnview.append_column(column2)
        column3 = Gtk.ColumnViewColumn(title='Size', factory=factory3)
        columnview.append_column(column3)
        #
        self.set_child(columnview)

    def on_listitem_setup(self, factory, item):
        item.set_child(Gtk.Label(xalign=0))

    def on_listitem_bind1(self, factory, item):
        info = item.get_item()
        label = item.get_child()
        label.props.label = info.get_name()

    def on_listitem_bind2(self, factory, item):
        info = item.get_item()
        label = item.get_child()
        label.props.label = info.get_content_type()

    def on_listitem_bind3(self, factory, item):
        info = item.get_item()
        label = item.get_child()
        label.props.label = f'{info.get_size()} byte'

    def on_columnview_activate(self, listview, pos):
        print(1)

app = Gtk.Application()
app.connect('activate', lambda a: Win(a).present())
app.run()

directorylist

イケるじゃん。
と思ったけどコレってソートはどうするんだ?
あと隠しファイル等を弾くには bind ハンドラ全部に同じ処理がいるよね。
たしかに簡単だけど実用にはチト使い辛い感じ。