Gedit RepeatLine Plugin

筆者は macOS で Visual Studio Code を使っている。
しかし Fedora では Gedit を使い続けている。
Fedora でも併用しようと考えたけど結局 Gedit しか使わない。

しかし Visual Studio Code には便利すぎる機能がある。
opthon(alt)+shift+down で行の複製ができる、これが超スバラシイ。

fn+left
shift+fn+right
command+c
fn+right
return
command+v

とやっていたことを一発だ、よく使うんだな行の複製って。
ちなみに fn の所は TextEdit.app 同様に command でもいい。
筆者は US 配列なので fn のほうが楽だということで。

てか mac の日本語キーボードは何故 fn が右なのか、マジで糞。
US 配列を店頭でも普通に買えるようにしてくれないかなぁ。
それは今は関係なくて。

Gedit でも同じことがやりたいぞ。
ということで Plugin を探し、、、じゃなくて作る!
何年ぶりの新規プラグイン作りだろう、ワクワク。

#-*- coding:utf-8 -*-

#    Gedit repeat plugin version 3.22.0
#    Copyright © 2018 sasakima-nao <sasakimanao@gmail.com>
#
#    This program is free software; you can redistribute it and/or modify
#    it under the terms of the GNU General Public License as published by
#    the Free Software Foundation; _endher version 2 of the License, or
#    (at your option) any later version.

import gi, os
gi.require_version("Gtk", "3.0")
gi.require_version("Gedit", "3.0")
gi.require_version("Peas", "1.0")

from gi.repository import GObject, Gedit, Gtk, Gio, GLib

class RepeatLineAppActivatable(GObject.Object, Gedit.AppActivatable):
    """
        Set GMenu and Accelerator
    """
    app = GObject.Property(type=Gedit.App)
 
    def __init__(self):
        GObject.Object.__init__(self)
 
    def do_activate(self):
        # "<Alt><Shift>Down" Not Work
        self.app.add_accelerator("<Alt><Shift>d", "win.repeatline", None)
        self.menu_ext = self.extend_menu("tools-section")
        item = Gio.MenuItem.new("Repeat Line",  "win.repeatline")
        self.menu_ext.append_menu_item(item)
 
    def do_deactivate(self):
        self.app.remove_accelerator("win.repeatline", None)

class RepeatLinePlugin(GObject.Object, Gedit.WindowActivatable):
    __gtype_name__ = "RepeatLinePlugin"
    window = GObject.Property(type=Gedit.Window)
    def __init__(self):
        GObject.Object.__init__(self)

    def do_activate(self):
        self.action = Gio.SimpleAction.new("repeatline", None)
        self.action.connect('activate', self.on_repeatline_activate)
        self.window.add_action(self.action)

    def do_deactivate(self):
        self.window.remove_action("repeatline")

    def do_update_state(self):
        self.action.set_enabled(self.window.get_active_document() != None)

    def on_repeatline_activate(self, action, param):
        view = self.window.get_active_view()
        buf = view.get_buffer()
        _start_ = buf.get_start_iter()
        _end_ = buf.get_end_iter()
        spos = buf.props.cursor_position
        epos = spos
        it = buf.get_iter_at_offset(spos - 1)
        line = None
        while 1:
            # search line start position
            if it.equal(_start_) or it.get_char() == "\n":
                line = it.copy()
                it = buf.get_iter_at_offset(epos)
                break
            spos -= 1
            it = buf.get_iter_at_offset(spos)
        while 1:
            # search line end position
            if it.equal(_end_) or it.get_char() == "\n":
                s = line.get_text(it)
                if line.equal(_start_):
                    s = "\n" + s
                buf.insert(it, s, -1)
                break;
            epos += 1
            it = buf.get_iter_at_offset(epos)

作ってみた。

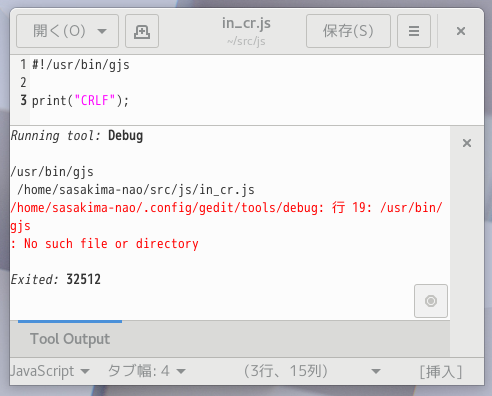
残念ながら Alt+Shift+Down は無視された。
Alt+Shift+D でいいやもう。

os.getenv(GEDIT_CURRENT_LINE)
が使えると思ったけどこれはプラグインからは参照できないのね。
しかたがないので GtkTextIter で地味に \n 位置を探すことに。

先頭と最後は \n が無いけどこんな処理でイケた。
何をやっているかは GtkTextBuffer のドキュメントで。

とりあえずこれで Gedit でも同様なことができるぞい。
探せば既にあるかもだけど、プログラミングは経験値だよと一言。

JXA: is Command Exist

Comipoli JXA 版はココにきて色々問題が出て困っている。
Fedora で作成した日本語入り cbz が開けなかったり…
コンパイルすると起動引数を受け付けないとか…
他色々…

間違いを堂々と書いていたり、私ってほんとバカ(古い
JXA NSOpenPanel | PaePoi
後で修正するのも面倒なので確実なものだけ書くようにしたい。

そういえば unrar や 7za がインストールしてあるか確認しないと。
JXA では、えっと。

#!/usr/bin/osascript

ObjC.import("Cocoa");

function isCommandExist(cmd) {
    let task = $.NSTask.new;
    let pipe = $.NSPipe.pipe;
    task.standardOutput = pipe;
    task.standardError = pipe;
    task.launchPath = "/usr/bin/type";
    task.arguments = $([cmd]);
    task.launch;
    task.waitUntilExit;
    return task.terminationStatus === 0;
}
console.log(isCommandExist("unzip"));
console.log(isCommandExist("unrar"));

これでいいか。

stdout, stderror を吐かないように pipe に入れて捨てている。
> /dev/null を配列にいれるとエラーになった。

ところで zipinfo -1 という素敵な手段を今頃知った。
unzip -Z -1 でもいい。

 if (/\.(cbz|zip)$/i.test(path)) {
    this.status = 0;
    this.namelist = [];
    //let output = this.getString(["unzip", "-Z", path]);
    let output = this.getString(["zipinfo", "-1", path]);
    let list = output.split("\n");
    for (let line of list) {
        if (PICEXT.test(line)) {
            this.namelist.push(line);
        }
        /*if (line.startsWith("-")) {
            let name = line.slice(53);
            if (PICEXT.test(name)) {
                this.namelist.push(name);
            }
        }*/
    }
    this.namelist.sort();
}

今まで何を。。。。。

Fedora も同様だった。
オリジナルも次はこれにしよう。

JXA NSToolbar (HeaderBar)

Cocoa にて GNOME アプリの GtkHeaderBar を再現したい。
ようするに Safari のタイトルバーみたいにボタンを置きたい。
GNOME は完全に専用 widget だけど Cocoa ではどうやっているのだ?

調べてみるとアレは実は単なる NSToolbar だ。
配置してタイトルバーを消す設定にすると勝手にタイトルバー化。

よしやってみよう、と探しても Xcode で扱う手段しか見つからない。
えっと Xcode は否定しないけど、皆 Xcode の使い方ばかり覚える方向になっていない?
Visual Studio 使いをソレで笑っていたけど macOS 屋もたいして変わらなかった。

NSToolbarDelegate – AppKit | Apple Developer Documentation

つぎはぎだらけの情報で作り方をまとめると。
NSToolbarDelegate は必須。
Configuring a Toolbar の項目は全部 override 必須。
NSToolbarItem は NSToolbarDelegate 内で作る。
NSToolbarItem の view には NSButton, NSTextField 等を指定できる。
NSLabel なんて無いから NSTextField を使う。
右寄せや中央配置には NSToolbarFlexibleSpaceItemIdentifier を使う。
NSToolbarDelegate の関数名は合体せずそのまんま書く。

実際の作り方はコードで。

#!/usr/bin/osascript

ObjC.import("Cocoa");

ObjC.registerSubclass({
    name: "ToolbarDelegate",
    protocols: ["NSToolbarDelegate"],
    methods: {
        "toolbarAllowedItemIdentifiers:":{
            types: ["id", ["id"]],
            implementation: (toolbar)=> {
                return $([]);
            }
        },
        "toolbarSelectableItemIdentifiers:":{
            types: ["id", ["id"]],
            implementation: (toolbar)=> {
                return $([]);
            }
        },
        "toolbarDefaultItemIdentifiers:":{
            types: ["id", ["id"]],
            implementation: (toolbar)=> {
                console.log("toolbar Default");
                return $.NSArray.arrayWithObjects(
                    $("OPEN"),
                    $.NSToolbarFlexibleSpaceItemIdentifier,
                    $("TITLE"),
                    $.NSToolbarFlexibleSpaceItemIdentifier,
                    $("LR"),
                    $("RIGHT")
                );
            }
        },
        "toolbar:itemForItemIdentifier:willBeInsertedIntoToolbar:": {
            //types: ["id", ["id", "id", "bool"]],
            implementation: (toolbar, itemIdentifier, flag)=> {
                console.log(itemIdentifier.js);
                let item = $.NSToolbarItem.alloc.initWithItemIdentifier(itemIdentifier);
                if (itemIdentifier.isEqualToString($("OPEN"))) {
                    item.view = openButton;
                } else if (itemIdentifier.isEqualToString($("TITLE"))) {
                    item.view = label;
                } else if (itemIdentifier.isEqualToString($("LR"))) {
                    item.view = lrButton;
                } else if (itemIdentifier.isEqualToString($("RIGHT"))) {
                    item.view = thumbButton;
                }
                return item;
            }
        }
    }
});

// buttons Delegate
ObjC.registerSubclass({
    name: "ToolButtonDelegate",
    methods: {
        "onToolButtonClicked": {
            types: ["void", ["id"]],
            implementation: (button)=> {
                label.stringValue = button.title;
            }
        }
    }
});
let appDelegate = $.ToolButtonDelegate.new;

/**
 * ToolBar Item
 */
// open
let openButton = $.NSButton.alloc.initWithFrame($.NSMakeRect(10, 10, 60, 40));
openButton.title = "Open";
openButton.bezelStyle = $.NSRoundedBezelStyle;
openButton.target = appDelegate;
openButton.action = "onToolButtonClicked";
// title
label = $.NSTextField.alloc.initWithFrame($.NSMakeRect(10, 10, 300, 20));
label.drawsBackground = false;
//label.bordered = false;
label.editable = false;
label.selectable = false;
label.stringValue = "Title";
// L/R
let lrButton = $.NSButton.alloc.initWithFrame($.NSMakeRect(10, 10, 60, 40));
lrButton.title = "L<-R";
lrButton.bezelStyle = $.NSRoundedBezelStyle;
lrButton.buttonType = $.NSPushOnPushOffButton;
lrButton.target = appDelegate;
lrButton.action = "onToolButtonClicked";
// thumbnail
let thumbButton = $.NSButton.alloc.initWithFrame($.NSMakeRect(10, 10, 60, 40));
thumbButton.image = $.NSImage.imageNamed($.NSImageNameIconViewTemplate);
thumbButton.bezelStyle = $.NSRoundedBezelStyle;
thumbButton.target = appDelegate;
thumbButton.action = "onToolButtonClicked";

/**
 * ToolBar
 */
let toolbar = $.NSToolbar.alloc.initWithIdentifier($("ToolbarTest"));
//toolbar.allowsUserCustomization = true;
//toolbar.autosavesConfiguration = true;
toolbar.delegate = $.ToolbarDelegate.new;

/**
 * Window
 */
let window = $.NSWindow.alloc.initWithContentRectStyleMaskBackingDefer(
    $.NSMakeRect(0, 0, 600, 400),
    $.NSTitledWindowMask
    | $.NSClosableWindowMask
    | $.NSMiniaturizableWindowMask
    | $.NSResizableWindowMask,
    $.NSBackingStoreBuffered,
    false
);
window.orderFrontRegardless;
// Like a GtkHeaderBar
window.titleVisibility = 1;
window.toolbar = toolbar;

/**
 * Application
 */
let app = $.NSApplication.sharedApplication;
app.setActivationPolicy($.NSApplicationActivationPolicyRegular);
app.mainMenu = function() {
    const mainMenu = $.NSMenu.new;
    const itemApp  = $.NSMenuItem.new;
    const menuApp  = $.NSMenu.new;
    itemApp.submenu  = menuApp;
    mainMenu.addItem(itemApp);
    menuApp.addItem($.NSMenuItem.alloc.initWithTitleActionKeyEquivalent("Quit", "terminate:", "q") );
    return mainMenu;
}();
app.run;

LR ボタンを右に移したけどほぼ同じタイトルバーのできあがり。
JXA だけで作れることは証明できた。

toolbar:itemForItemIdentifier:willBeInsertedIntoToolbar:
の types はコレでいいと思うんだけど何故かエラー。
コメントアウトしても動くのでこれでいいや。

allowsUserCustomization 等を true にするとカスタムできる。
ツールバーを指二本タップで出る奴、って筆者は今まで知らなかったぞ!

だって mac ではボタンなんてほとんど使わないモン。
Dock ですら邪魔なので全部消して一番小さく設定しているくらい。

Toolbar は何のアプリかを一眼で見分ける目印、って感じ。
TextEdit.app と見た目が同じじゃつまんないもんね。

Gedit External Tools CRLF

Gedit の External Tools が変だ。

何故コマンドが改行されているのだ?
head コマンドの挙動が変わってしまったのだろうか。

一時間くらいすったもんだしてやっと理由が判明。
何故か改行コードが CRLF になっていたからだった。

head -n1 は LF までを戻すので直前の CR は残ってしまうみたい。
てか bash が CR を改行と認識すると初めて知った。
CR を使うなですむ話だけど、一応対策。

#!/bin/sh

# Do shebang

#h=`head -n1 $GEDIT_CURRENT_DOCUMENT_PATH`
# Remove CR
h=`head -n1 $GEDIT_CURRENT_DOCUMENT_PATH | tr -d '\r'`
if [[ $h = \#\!* ]]; then
    app=${h#*\!}
    echo $app $GEDIT_CURRENT_DOCUMENT_PATH
    $app $GEDIT_CURRENT_DOCUMENT_PATH
fi

普段はまったく無意味な処理なんだけどね。

JXA NSUserDefaults

GUI アプリの再起動で前回終了した位置と大きさを再現したい。
Cocoa は NSUserDefaults という超便利なものを用意しているようだ。

EZ-NET: NSUserDefaults でアプリケーションの設定値を管理する : Objective-C プログラミング

まて、JXA で js のまま動かして値を保存するとどうなるんだ?
com.apple.osascript.plist に保存されてしまった、あーあやっぱり。

Windowの位置やサイズを前回終了時の状態に復元する – Xcode coding memo

debug は当然 js のまま行うので上記の超簡単手段は使えないなぁ。
osacompile 後はアプリ名になると思うけど、多分。
つか com.apple.***.plist みたいなのばかりだし誰もやっていないんじゃないの?

NSUserDefaults – Foundation | Apple Developer Documentation

initWithSuiteName という関数があるじゃないの。
これで js のままとコンパイル後で同じ設定が読み書きできるはず。
com.*** のほうがカッコイイし。

// Read
let defaults = $.NSUserDefaults.alloc.initWithSuiteName("com.sasakima.comipoli");
let aw = defaults.floatForKey("width");
if (aw == 0) aw = 400;
let ah = defaults.floatForKey("height");
if (ah == 0) ah = 400;
let x = defaults.floatForKey("x");
let y = defaults.floatForKey("y");
this.window = $.NSWindow.alloc.initWithContentRectStyleMaskBackingDefer(
    $.NSMakeRect(x, y, aw, ah),
//etc...

// Write
let defaults = $.NSUserDefaults.alloc.initWithSuiteName("com.sasakima.comipoli");
defaults.setFloatForKey(this.window.frame.size.width, "width");
defaults.setFloatForKey(this.window.frame.size.height, "height");
defaults.setFloatForKey(this.window.frame.origin.x, "x");
defaults.setFloatForKey(this.window.frame.origin.y, "y");
defaults.synchronize;

イケた。

floatForKey は plist が存在しない場合はゼロが戻るだけみたい。
NSRect で保存する手段もあるみたいだけど plist が存在しない場合にチト困る。

ところで NSApp という定義でアプリケーションが参照できるのね。
sharedApplication の戻り値を得る必要は無かった。

function run(argv) {
    $.NSApplication.sharedApplication;
    // etc...
    $.NSApp.run;
}

んで。
キーボード操作は暫定で以下のように、space, delete でも同様に動くように。
space を使うので装飾は opthion キーしか選択肢が無くなったことは秘密。

icns を作る方法は以下のサイトを参考に、手抜きで画像一つだけでもイケた。
icnsファイルの作り方(Mac) – 2番煎じMEMO

現在ダイアログやもう一つウインドウを出す手段に苦しんでいる。
コレができないと同一ディレクトリ巡回やサムネイル選択が作れない。
あと何やったか忘れた、ここまでのバックアップ。
comimac-0.0.1.tar.gz