Paepoi » PyObjC Tips » NSView
NSView
最終更新日 2024.08.25
単体で使う場合は主に線や図形、又は画像の描写を行う場合に利用します。
ところで、AppKit の API はものすごく古臭いです。
レイアウタはありません、絶対位置と絶対サイズで配置する必要がある。
文字列のはみ出しに注意したり NSWindow のリサイズに合わせたりする必要がある。
NSWindow の contentView プロパティは NSView ですが配置しかできません。
この contentView に subView として NSView を配置していく。
nib を使う場合は NSViewController を使ってロードします。
ここでは使わないので直接配置しています。
グラフィック(デバイス)コンテキストの指定がありません。
AppKit での描写はフォーカスをロックして描写という流れなので不要なだけです。
そんなこんなで色々描写してみます。
だって普通画像を使うよね。
CGContext というものがあるので他の API を知っているなら解りやすいかも。
プリフィクスが長くなるので as を使って省略するといいでしょう。
NSView 概要
NSView は配置や描写を行う基底クラスです。単体で使う場合は主に線や図形、又は画像の描写を行う場合に利用します。
ところで、AppKit の API はものすごく古臭いです。
レイアウタはありません、絶対位置と絶対サイズで配置する必要がある。
文字列のはみ出しに注意したり NSWindow のリサイズに合わせたりする必要がある。
NSWindow の contentView プロパティは NSView ですが配置しかできません。
この contentView に subView として NSView を配置していく。
nib を使う場合は NSViewController を使ってロードします。
ここでは使わないので直接配置しています。
drawRect
drawRect というハンドラで描写しますが、他の API と何か違いますよね。グラフィック(デバイス)コンテキストの指定がありません。
AppKit での描写はフォーカスをロックして描写という流れなので不要なだけです。
そんなこんなで色々描写してみます。
#!/usr/bin/env python3
import AppKit, objc
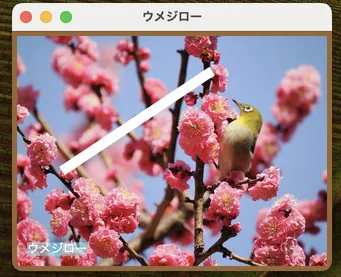
PIC = 'umejiro3.jpg' # 手持ち画像に書き換えしてください
class MyView(AppKit.NSView):
def initWithFrame_(self, rect):
objc.super(MyView, self).initWithFrame_(rect)
return self
def drawRect_(self, rect):
# 背景の塗りつぶし
AppKit.NSColor.brownColor().set()
AppKit.NSRectFill(rect)
# 背景から 5px オフセットして枠っぽく画像
rect_img = AppKit.NSInsetRect(rect, 5, 5)
image = AppKit.NSImage.alloc().initWithContentsOfFile_(PIC)
image.drawInRect_(rect_img)
# 線
AppKit.NSColor.whiteColor().set()
path = AppKit.NSBezierPath.bezierPath()
path.setLineWidth_(10)
path.moveToPoint_((50, 100))
path.lineToPoint_((200, 200))
path.stroke()
# 文字列
bg_color = AppKit.NSColor.colorWithSRGBRed_green_blue_alpha_(0.4, 1.0, 1.0, 0.5)
text = AppKit.NSAttributedString.alloc().initWithString_attributes_(
'ウメジロー',
{
AppKit.NSForegroundColorAttributeName: AppKit.NSColor.whiteColor(),
AppKit.NSBackgroundColorAttributeName: bg_color
})
AppKit.NSColor.blueColor().set()
text.drawAtPoint_((15, 15))
#def isFlipped(self):
# # 描写原点は左下です、コレを有効にすると左上が原点になる
# return True
class MyWindow(AppKit.NSWindow):
def init(self):
rect = AppKit.NSMakeRect(0, 0, 320, 240)
objc.super(MyWindow, self).initWithContentRect_styleMask_backing_defer_(
rect,
AppKit.NSTitledWindowMask |
AppKit.NSClosableWindowMask |
AppKit.NSResizableWindowMask |
AppKit.NSMiniaturizableWindowMask,
AppKit.NSBackingStoreBuffered, False)
# NSView
self.canvas = MyView.alloc().initWithFrame_(rect)
self.contentView().addSubview_(self.canvas)
# etc
self.setTitle_('ウメジロー')
self.setDelegate_(self)
return self
def windowDidResize_(self, sender):
# GTK+ や WPF のように追従してくれないので
self.canvas.setFrameSize_(self.contentView().frame().size)
class AppDelegate(AppKit.NSObject):
wins = []
def applicationDidFinishLaunching_(self, notification):
window = MyWindow.new()
window.makeKeyAndOrderFront_(window)
self.wins.append(window)
AppKit.NSApp.activateIgnoringOtherApps_(True)
def applicationSupportsSecureRestorableState_(self, app):
return True
class AppMenu(AppKit.NSMenu):
def init(self):
objc.super(AppMenu, self).init()
item_app = AppKit.NSMenuItem.new()
self.addItem_(item_app)
menu_app = AppKit.NSMenu.new()
item_app.setSubmenu_(menu_app)
# quit menu
item_quit = AppKit.NSMenuItem.new()
item_quit.initWithTitle_action_keyEquivalent_('Quit App', 'terminate:', 'q')
menu_app.addItem_(item_quit)
return self
AppKit.NSApplication.sharedApplication()
AppKit.NSApp.setMainMenu_(AppMenu.new())
AppKit.NSApp.setDelegate_(AppDelegate.new())
AppKit.NSApp.run()
図形は省いた。だって普通画像を使うよね。
CoreGraphics を使う
PyObjC からでも CoreGraphics を直接使えます、C 言語と同じだから面倒だけど。CGContext というものがあるので他の API を知っているなら解りやすいかも。
プリフィクスが長くなるので as を使って省略するといいでしょう。
import AppKit, objc
from Quartz import CoreGraphics as cg

class MyView(AppKit.NSView):
    def initWithFrame_(self, rect):
        objc.super(MyView, self).initWithFrame_(rect)
        return self

    def drawRect_(self, rect):
        # CoreGraphics 直描写
        ctx = cg.NSGraphicsContext.currentContext().CGContext()
        # 背景の塗りつぶし
        rgb = cg.CGColorCreateGenericRGB(0.5, 1.0, 0.7, 1)
        cg.CGContextSetFillColorWithColor(ctx, rgb)
        cg.CGContextFillRect(ctx, rect)
        # moveto, lineto
        cg.CGContextSetRGBStrokeColor(ctx, 1.0, 0, 0, 1)
        cg.CGContextSetLineWidth(ctx, 10)
        cg.CGContextMoveToPoint(ctx, 100.0, 100.0)
        cg.CGContextAddLineToPoint(ctx, 200, 200)
        # まとめることもできる
        cg.CGContextAddLines(ctx, [(50, 100), (50, 200)], 2)
        # 描写
        cg.CGContextDrawPath(ctx, cg.kCGPathStroke)
Copyright(C) sasakima-nao All rights reserved 2002 --- 2026.