Paepoi » PyObjC Tips » NSTextField
NSTextField
最終更新日 2024.08.25
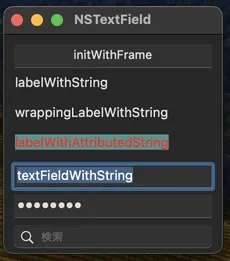
ラベルと一行エディットはすべて NSTextField でまかないます。
initWithFrame を使いサイズ指定で作る他に labelWithString 等も使えます。
こちらだと文字列サイズピッタリの大きさで作成されるようです。
親 View や Window のメソッドにアクセスするには下記のようにします。
Label と Entry
AppKit に NSLabel みたいなラベル専用ウイジェットはありません。ラベルと一行エディットはすべて NSTextField でまかないます。
initWithFrame を使いサイズ指定で作る他に labelWithString 等も使えます。
こちらだと文字列サイズピッタリの大きさで作成されるようです。
#!/usr/bin/env python3

import AppKit, objc

class MyView(AppKit.NSView):
    def initWithFrame_(self, rect):
        objc.super(MyView, self).initWithFrame_(rect)
        # 通常の NSControl として
        tf0 = AppKit.NSTextField.alloc().initWithFrame_(AppKit.NSMakeRect(10, 10, 200, 25))
        tf0.setDrawsBackground_(False)
        tf0.setEditable_(False)
        tf0.setSelectable_(False)
        tf0.setStringValue_('initWithFrame')
        tf0.setAlignment_(AppKit.NSTextAlignmentCenter)
        self.addSubview_(tf0)
        # 普通のラベル (GtkLabel)
        tf1 = AppKit.NSTextField.labelWithString_('labelWithString')
        tf1.setFrameOrigin_((10, 40))
        self.addSubview_(tf1)
        # 選択可能なラベル
        tf2 = AppKit.NSTextField.wrappingLabelWithString_('wrappingLabelWithString')
        tf2.setFrameOrigin_((10, 70))
        self.addSubview_(tf2)
        # 装飾付き
        bg_color = AppKit.NSColor.colorWithSRGBRed_green_blue_alpha_(0.4, 1.0, 1.0, 0.5)
        astr = AppKit.NSAttributedString.alloc().initWithString_attributes_(
            'labelWithAttributedString',
            {
                AppKit.NSForegroundColorAttributeName: AppKit.NSColor.redColor(),
                AppKit.NSBackgroundColorAttributeName: bg_color
            })
        tf3 = AppKit.NSTextField.labelWithAttributedString_(astr)
        tf3.setFrameOrigin_((10, 100))
        self.addSubview_(tf3)
        # 書き換え可能 (GtkEntry)
        tf4 = AppKit.NSTextField.textFieldWithString_('textFieldWithString')
        tf4.setFrame_(((10, 130), (200, 25)))
        self.addSubview_(tf4)
        # 文字が表示されないアレ
        tf5 = AppKit.NSSecureTextField.textFieldWithString_('password')
        tf5.setFrame_(((10, 160), (200, 25)))
        self.addSubview_(tf5)
        # 検索
        tf6 = AppKit.NSSearchField.alloc().initWithFrame_(((10, 190), (200, 25)))
        tf6.setPlaceholderString_('検索')
        self.addSubview_(tf6)
        #
        return self

    def isFlipped(self):
        # 左上を原点にする
        return True

class MyWindow(AppKit.NSWindow):
    def init(self):
        rect = AppKit.NSMakeRect(0, 0, 220, 220)
        objc.super(MyWindow, self).initWithContentRect_styleMask_backing_defer_(
            rect,
            AppKit.NSTitledWindowMask |
            AppKit.NSClosableWindowMask |
            AppKit.NSResizableWindowMask |
            AppKit.NSMiniaturizableWindowMask,
            AppKit.NSBackingStoreBuffered, False)
        # NSView
        self.canvas = MyView.alloc().initWithFrame_(rect)
        self.contentView().addSubview_(self.canvas)
        # etc
        self.setTitle_('NSTextField')
        self.setDelegate_(self)
        return self

    def windowDidResize_(self, sender):
        # GTK+ や WPF のように追従してくれないので
        self.canvas.setFrameSize_(self.contentView().frame().size)

class AppDelegate(AppKit.NSObject):

    wins = []

    def applicationDidFinishLaunching_(self, notification):
        window = MyWindow.new()
        window.makeKeyAndOrderFront_(window)
        self.wins.append(window)
        AppKit.NSApp.activateIgnoringOtherApps_(True)

    def applicationSupportsSecureRestorableState_(self, app):
        return True

class AppMenu(AppKit.NSMenu):
    def init(self):
        objc.super(AppMenu, self).init()
        item_app  = AppKit.NSMenuItem.new()
        self.addItem_(item_app)
        menu_app = AppKit.NSMenu.new()
        item_app.setSubmenu_(menu_app)
        # quit menu
        item_quit = AppKit.NSMenuItem.new()
        item_quit.initWithTitle_action_keyEquivalent_('Quit App', 'terminate:', 'q')
        menu_app.addItem_(item_quit)
        return self

AppKit.NSApplication.sharedApplication()
AppKit.NSApp.setMainMenu_(AppMenu.new())
AppKit.NSApp.setDelegate_(AppDelegate.new())
AppKit.NSApp.run()
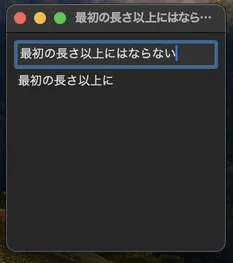
文字列変更メッセージ
TextField 文字列変更の監視は textDidChange をオーバーライドします。親 View や Window のメソッドにアクセスするには下記のようにします。
#!/usr/bin/env python3

'''
    変更すると同じ文字列を下とタイトルバーにコピーするサンプル
'''

import AppKit, objc

class MyEdit(AppKit.NSTextField):
    def textDidChange_(self, notification):
        # NSText なので string property から
        s = notification.object().string()
        # superview Property で親 View にアクセス
        self.superview().setString_(s)
        # window Property で親 Window にアクセス
        self.window().setTitle_(s)

class MyView(AppKit.NSView):
    def initWithFrame_(self, rect):
        objc.super(MyView, self).initWithFrame_(rect)
        # 書き換え可能 (GtkEntry)
        tf = MyEdit.textFieldWithString_('')
        tf.setFrame_(((10, 10), (200, 25)))
        self.addSubview_(tf)
        # 普通のラベル (GtkLabel)
        self.tf1 = AppKit.NSTextField.labelWithString_('labelWithString')
        self.tf1.setFrameOrigin_((10, 40))
        self.addSubview_(self.tf1)
        #
        return self

    def setString_(self, s):
        # 最初の長さ以上にはならない
        self.tf1.setStringValue_(s)

    def isFlipped(self):
        # 左上を原点にする
        return True

class MyWindow(AppKit.NSWindow):
    def init(self):
        rect = AppKit.NSMakeRect(0, 0, 220, 220)
        objc.super(MyWindow, self).initWithContentRect_styleMask_backing_defer_(
            rect,
            AppKit.NSTitledWindowMask |
            AppKit.NSClosableWindowMask |
            AppKit.NSResizableWindowMask |
            AppKit.NSMiniaturizableWindowMask,
            AppKit.NSBackingStoreBuffered, False)
        # NSView
        self.canvas = MyView.alloc().initWithFrame_(rect)
        self.contentView().addSubview_(self.canvas)
        # etc
        self.setTitle_('NSTextField')
        self.setDelegate_(self)
        return self

    def windowDidResize_(self, sender):
        # GTK+ や WPF のように追従してくれないので
        self.canvas.setFrameSize_(self.contentView().frame().size)

class AppDelegate(AppKit.NSObject):

    wins = []

    def applicationDidFinishLaunching_(self, notification):
        window = MyWindow.new()
        window.makeKeyAndOrderFront_(window)
        self.wins.append(window)
        AppKit.NSApp.activateIgnoringOtherApps_(True)

    def applicationSupportsSecureRestorableState_(self, app):
        return True

class AppMenu(AppKit.NSMenu):
    def init(self):
        objc.super(AppMenu, self).init()
        item_app  = AppKit.NSMenuItem.new()
        self.addItem_(item_app)
        menu_app = AppKit.NSMenu.new()
        item_app.setSubmenu_(menu_app)
        # quit menu
        item_quit = AppKit.NSMenuItem.new()
        item_quit.initWithTitle_action_keyEquivalent_('Quit App', 'terminate:', 'q')
        menu_app.addItem_(item_quit)
        return self

AppKit.NSApplication.sharedApplication()
AppKit.NSApp.setMainMenu_(AppMenu.new())
AppKit.NSApp.setDelegate_(AppDelegate.new())
AppKit.NSApp.run()
Copyright(C) sasakima-nao All rights reserved 2002 --- 2026.